
A step-by-step guide to bundling, facing slips, and getting your postcards into the mail without USPS rejecting them
Your postcards are back from the printer. Your advertisers are confirmed. Now comes the final operational step before your campaign goes live — preparing your mailers for USPS drop-off.
This is the step most new agency owners are most nervous about. The post office has specific requirements, and the paperwork can look intimidating the first time. But once you’ve done it once, it takes maybe 30–45 minutes for a standard campaign.
This lesson walks through the entire process from the moment your postcards arrive to the moment you hand them to the post office.
What Is EDDM Retail and Why It Matters
EDDM stands for Every Door Direct Mail. It’s a USPS program designed specifically for businesses that want to mail to every address on a carrier route — no mailing list required, no individual addresses needed.
There are two versions:
EDDM Retail, the version most small agency owners use. You pay online, print your own forms, and drop off at your local post office. No permit required. Limited to 5,000 pieces per day per mailer.
EDDM BMEU (Business Mail Entry Unit), used for larger volume campaigns. Requires a USPS permit and drop-off at a bulk mail facility. Most agency owners don’t need this until they’re mailing 10,000+ pieces consistently.
For your first several campaigns, EDDM Retail is all you need.
Step 1: Select Your Routes and Pay Online
Before you touch a single postcard, complete your USPS order online.
Go to eddm.usps.com and sign in or create a free account.
From the dashboard:
- Enter your target zip code
- Use the map to browse available carrier routes
- Filter by residential, business, or both
- Check demographic filters, age range, household income, household size, to target the right neighborhoods
- Select the routes you want and note the total address count
- Pay online for your selected routes
Important: EDDM Retail caps at 5,000 pieces per day per mailer. If your campaign covers 8,000 homes, you’ll need to split the drop-off across two days. This is completely allowed — just plan your timeline accordingly.
After payment, you’ll get a confirmation and access to your required forms.
Step 2: Print Your EDDM Forms and Facing Slips
Once payment is complete, click “Print All Forms.”
You’ll receive:
- EDDM Retail Facing Slips, one per bundle of 100 postcards
- Master route list, shows every route, address count, and bundle breakdown
- Summary page, total pieces, total postage paid, drop-off date
Print extras of everything. USPS clerks sometimes ask for additional copies, and it’s easier to have spares than to reprint at the post office.
Fill in your facing slips before you leave home:
- Number of pieces in the bundle (usually 100, or fewer for your last bundle)
- Postcard weight (your printer can tell you, or weigh one on a kitchen scale)
- Date of mailing
Sign each facing slip. An unsigned slip can cause USPS to reject your bundle.
Step 3: Receive and Inspect Your Postcards
When your printed postcards arrive, inspect them before you do anything else.
Check for:
- Color accuracy, does it match your proof?
- Print quality are edges clean, no smearing or banding?
- Correct quantity count a sample tray and estimate total
- EDDM indicia, the permit imprint on the back should be present and legible
- Correct size, hold one up to a ruler. 9″ × 12″ is exact. USPS will reject undersized cards.
If something is wrong, contact your printer immediately. Most reputable printers will reprint for free if the error is on their end. This is why you ordered with enough lead time, you need a buffer for reprint situations.
If everything looks correct, you’re ready to bundle.
Step 4: Bundle Your Postcards
USPS requires postcards to be bundled in groups of 100 pieces, secured with rubber bands.
The bundling process:
- Count out 100 postcards
- Make sure they’re all facing the same direction, EDDM indicia facing up
- Wrap a rubber band around the bundle both vertically and horizontally (an X pattern)
- Repeat for every bundle
- Your last bundle will likely be less than 100, that’s fine, bundle it separately and note the count on the facing slip
How many bundles will you have?
If you’re mailing to 2,400 homes: 24 bundles of 100. If you’re mailing to 5,000 homes: 50 bundles.
Pro tip: This is the most time-consuming part of the process. For a 5,000-piece campaign, budgeting 45–60 minutes for bundling is realistic. Put on a podcast and get comfortable.
Many printers offer EDDM-ready bundling as part of their service, they ship your postcards pre-bundled in groups of 100, which eliminates this step entirely. BlockbusterPrint is one that does this well. If your volume justifies it, it’s worth paying for.
Step 5: Insert Facing Slips
Once your bundles are ready, insert one facing slip on top of each bundle, placed between the rubber band and the top postcard so it’s clearly visible.
Each facing slip should show:
- The route it belongs to (from your master list)
- Number of pieces in the bundle
- Your signature
If you’re covering multiple routes, organize your bundles by route before inserting facing slips. Group all bundles for Route A together, then Route B, and so on. Label each group with a sticky note or piece of tape so you can hand them over clearly at the post office.
Step 6: Pack for Drop-Off
USPS post offices accept EDDM drop-offs in:
- Standard USPS mail trays (the grey plastic trays)
- Cardboard boxes from your printer
- Any container that keeps bundles organized and protected
If your printer shipped in USPS trays, reuse them, this makes drop-off much easier. Stack your bundles flat in the tray, organized by route, with facing slips visible on top.
What to bring to the post office:
- All bundled postcards with facing slips inserted
- Printed master route list (one copy for you, one for USPS)
- Printed summary page showing total paid
- Your USPS account confirmation email (on your phone is fine)
- Personal ID
Call your local post office ahead of time to confirm their EDDM drop-off hours. Some post offices require drop-off before a certain time to process same-day. Others have a dedicated counter. A quick call prevents a wasted trip.
Step 7: The Post Office Drop-Off
Walk in, tell the clerk you have an EDDM Retail drop-off, and hand over your documentation first.
The clerk will:
- Verify your route list matches your payment confirmation
- Check that facing slips are present and signed
- Count bundles or spot-check quantities
- Accept the postcards and give you a receipt
Common reasons USPS rejects EDDM drop-offs:
- Unsigned facing slips
- Bundles over or significantly under 100 pieces without a noted count
- Missing or illegible EDDM indicia on the postcards
- Postcard size outside USPS specs
- Mailing more than 5,000 pieces without a bulk permit
If a clerk flags an issue, stay calm and ask what they need. Most issues are fixable on the spot, a signature, a recount, a quick fix. Clerks deal with EDDM regularly and are usually helpful if you’re organized and polite.
Once accepted, your postcards enter the USPS delivery stream and typically reach homes within 3–5 business days.
Step 8: Notify Your Advertisers
The moment you hand your postcards to USPS, send a quick update to every advertiser:
“Great news, your campaign dropped off at [Post Office Name] today. Postcards should start arriving in homes by [estimated date]. Let me know if you get any calls or responses!”
This small step builds enormous trust. Most advertisers have no idea when their ads will land, proactively telling them makes you look professional and sets them up to track their results.
If you’re using the 9×12 Agency CRM, you can send campaign updates to all your advertisers directly from the platform, no copying and pasting into individual emails.
Keeping Records for Future Campaigns
After every drop-off, save:
- Your USPS payment confirmation
- The master route list
- A copy of your final print file
- Notes on any issues, printer delays, USPS feedback, client late submissions
These records make your next campaign faster. You’ll know exactly which routes performed well, which advertisers rebooked, and where your timeline got tight.
Over time, you’ll develop a rhythm, a consistent production schedule that runs like clockwork because you’ve done it enough times to know exactly what each step takes.
A Quick Note on Scaling
Once you’re comfortable running one campaign, the natural next step is running two or three simultaneously in different neighborhoods.
The operational challenge isn’t the USPS steps, those stay the same. The challenge is managing multiple campaigns, multiple advertisers, multiple deadlines, and multiple print orders without losing track.
This is where the 9×12 Agency CRM becomes essential. Every campaign has its own dashboard, mail date, advertiser list, payment status, design submissions. You’re not juggling spreadsheets and email threads. Everything is in one place, organized by campaign, and accessible from anywhere.
→ Try it free at crm.9x12agency.com
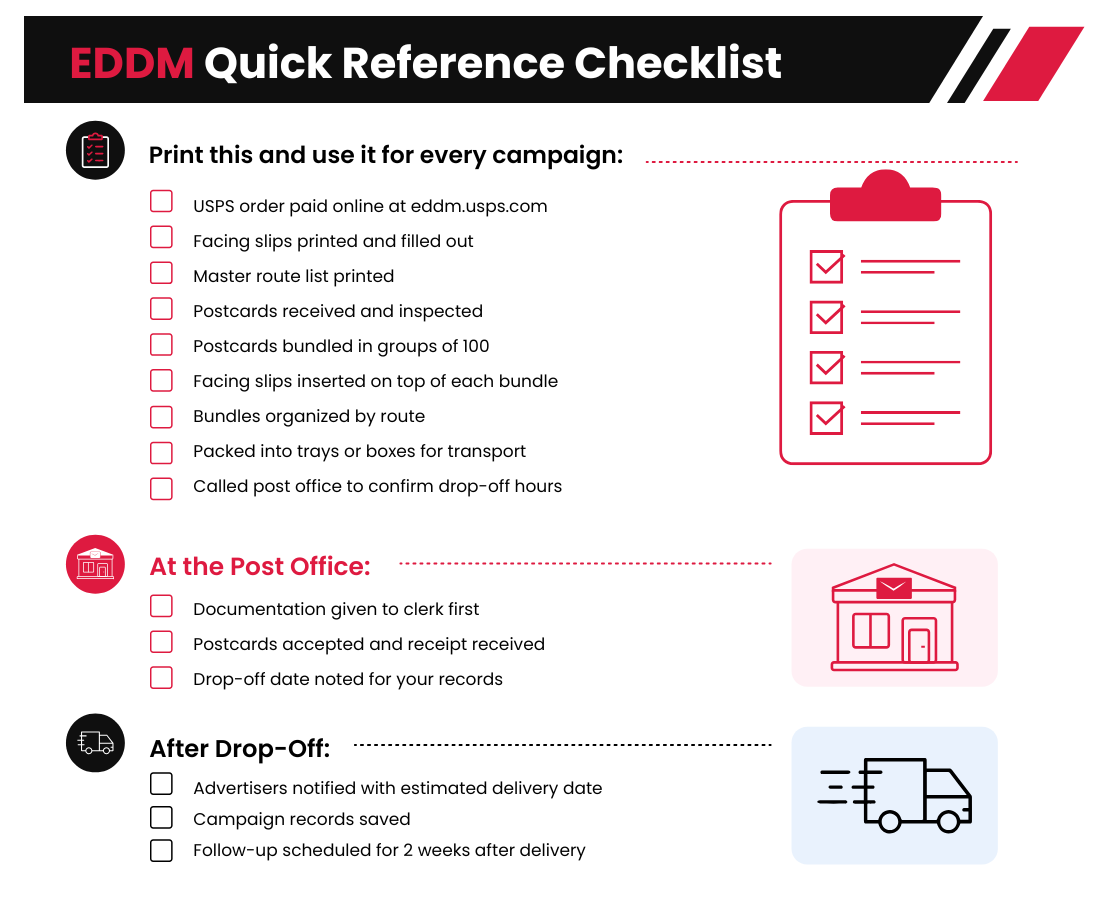
EDDM Quick Reference Checklist (Free Canva Template Download)
Ready for the Final Lesson?
Your postcards are in homes. Now comes the question every advertiser will ask: “Is this working?” Lesson 6 covers how to help your advertisers track results, and why this skill turns one-time clients into long-term repeat customers.
→ Continue to Lesson 6: How to Measure Success from a Direct Mail Campaign
Running multiple campaigns and need a better system? The 9×12 Agency CRM manages your campaigns, clients, bookings, and payments in one place. Or start with our Agency Starter Bundle, Canva templates, 50+ ad designs, and a ready-to-launch website.
